11 Apr 2017
Active Record enables Rails developers to model, store and query their application’s data, often without ever having to write a line of SQL.
While this is amazing for getting an app up and running quickly, once it’s up and running, you will undoubtedly experience performance issues and find yourself examining SQL queries.
In this post I’ll share with you an example of a performance issue that can creep in when using the ActiveRecord::QueryMethods order function and how to fix it.
A Typical Rails Scenario
Lets take a blog app as an example and assume we have a Posts table and a Users table.
The relationship between these tables is a User has many Posts.
The Posts table is linked by the foreign key user_id to the Users table.
Posts

Users

You’re bound to see an ActiveRecord statement that’s something like this:
With Active Record we can easily write a query to retrieve all the posts for a user and order them by when they were last updated.
Active Record will go and generate the following SQL query:
However Active Record won’t check this query’s performance for you and when you go live with your blog you’ll see a big difference ordering 1 post vs ordering 1000 posts.
Copy this generated SQL query into your preferred SQL editor and prepend the EXPLAIN keyword to the start of the query.
EXPLAIN Yo Self
EXPLAIN is a must know for any serious Rails developer, it helps you understand your queries and identify possible performance issues.
There are already many good blog posts on EXPLAIN and it’s usage, such as this one here.
Below is the output of running EXPLAIN on our query.

As you can see this is a terrible query, it is using no indexes and doing a full table scan, luckily there’s only 4 rows!
So the first thing most people will do in this case is add a foreign key constraint for user_id on the Posts table.
Lets do that first and re-run the explained query.

Things are looking a lot better now with the addition of the foreign key constraint.
If you look in the Extra column you’ll notice that there are two statements “Using index” (good) and “Using filesort” (bad).
What is Filesort then?
Using Filesort means you are performing a sort that can’t use an index.
You might be thinking to yourself “I already added my foreign key so I do have an index”.
While it’s true that you have an index, you haven’t created an index on the required columns for the sort.
This leads to:
- A full scan of the result set
- Using the filesystem to store chunks when the sort buffer in memory gets full
- A decrease in query performance as the result set grows
How to fix it
Fortunately the hardest part of dealing with these types of performance issues is identifying them.
To solve the Filesort issue we simply need to add an index to the appropriate columns.
Going back to our Active Record generated SQL query, we can see that the columns we need to index are user_id and updated_at.
Lets add the index and EXPLAIN our query one last time.

Finally we have a query using the new index user_id_updated_at and “Using Filesort” is a thing of the past.
12 Mar 2017
Recently I came across a challenging piece of work.
I was required to write a pure Ruby solution to extract and parse digital certificates from PE files.
Reading in .der and .pem files
Before I cover how to extract digital certificates from a PE file let’s take a look at a standard PKCS7 certificate in .der format.
First I read in my_certificate.der and create an OpenSSL::PKCS7 object from the raw certificate string.
I then instantiate the DigitalCertificateParser class with the PKCS7 object as a parameter.
Digital signatures are usually a collection of X509 certificates within a PKCS7 certificate, the X509 certificates are the ones we’re interested in.
The parser pulls these OpenSSL::X509 certificates out from the PKCS7 certificate on line 5.
I can now call @digital_certificate_parser.chains to build an array containing one or more ordered arrays of digital certificates,
from the root certificate to the end user certificate, with intermediate certificates in between.
The logic I’ve implemented here is based on ‘name match’ validation which is explained very well in this article.
In a nutshell certificates in a chain are linked by their subject and issuer values.
The issuer value of a end user certificate should be the subject of the next certificate in the chain, this continues up the chain to the root certificate.
The root certificate is the certificate that does not have it’s issuer referenced by any other certificate as it is a loop back to itself.
Decorating the certificate’s data
You’ll notice the parser is creating an object called @all_certificates when it’s initialized.
This is basically mapping all the X509 certificates to become DigitalCertificate objects.
The DigitalCertificate object is one I’ve written, it uses the Decorator design pattern by inheriting from the SimpleDelegator class.
This allows me to add functions like time_stamping_certificate? and to_db to the X509 certificates.
I can also overwrite functions that the OpenSSL::X509 object would usually respond to like subject with the subject value decorated, in this case as a string.
The Decorator pattern also allows me to call functions like to_der, to_pem and verify, so essentially what we have is an X509 certificate object with some extra functionality I’ve added.
Digital signatures will usually include a timestamp countersignature, when working with certificates I wasn’t concerned with these so I chose to identify them and ignore them.
If you are interested in them you can remove the check in this class and the check in the DigitalCertificateParser class.
To extract one or more certificates from a PE file I’m going to use the gem pedump.
If you’re using Bundler then just add this gem to your Gemfile, otherwise you can install it with gem install pedump.
The gem has a command-line implementation, but this didn’t suit my requirements so I used pedump’s code instead.
I have observed one caveat when using the pedemp gem, it is unable to extract SHA256 digital certificates if all certificates in the chain are signed with the sha256 algorithm.
This class is just an example class, to show you how you can pull digital certificates from PE files.
You might want to extract all the certificates instead of just the end user certificate, all you have to do just write a function in this class that calls parser.chains.
The certificate objects that are returned can be decorated any way you like by modifying the DigitalCertificate class to suit your needs.
Putting it all together
So far the code covers parsing certificates from .der and .pem files,
extracting certificates from PE files and decorating certificates to display information in a way you want.
The last snippet I’ll share is some examples of how to use this code.
Feel free to modify the code to suit your needs.
26 Feb 2017
@RailsDeveloper Want to implement your own version of twitter's mention feature?
In this post I'll show you how to implement the mention feature for posts, but don't feel limited to just posts.
You can easily adapt the code to work on comments, articles, tickets or whatever you like.
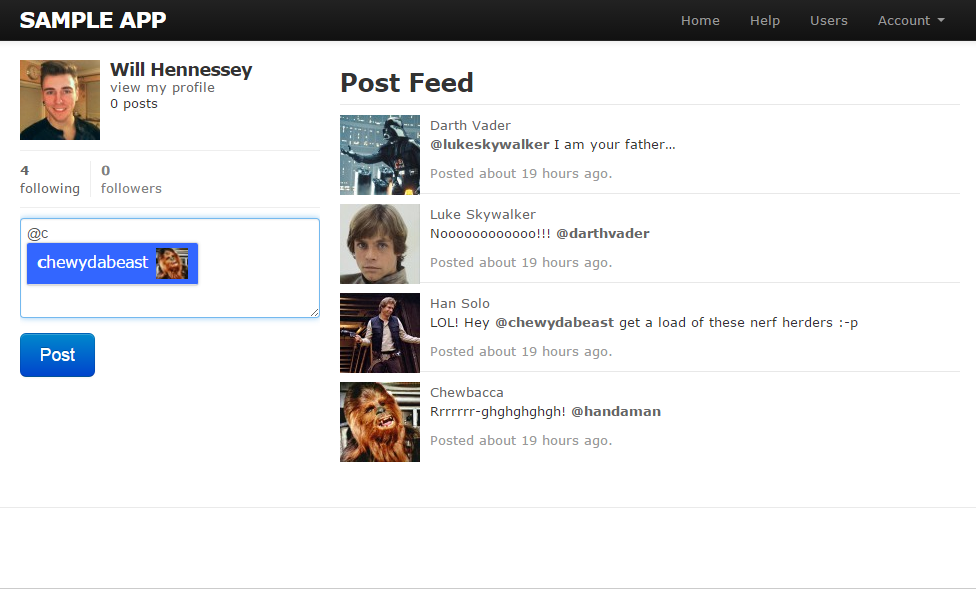
I’ve uploaded a sample Twitter style app that you guys can find on my github.
It’s based off Michael Hartl’s Ruby on Rails tutorial which I highly recommend if you’re just starting out with Ruby on Rails.
Just follow the readme on Github to try it out.
Setup
First things first, you’ll need to install and configure jquery-atwho-rails and the redcarpet gem.
Add gem 'jquery-atwho-rails' and gem 'redcarpet' to your Gemfile then do a bundle install
The jquery-atwho-rails gem is going to handle the javascript that’s invoked when a user types @ in a text field.
I’m also using the redcarpet markdown gem to add markdown to a mention, this will display the mention as a bold clickable link.
Implementation
To begin with you’ll need to add a markdown function to the application_helper, this function will be used by the view to render your mention, decorated with markdown.
Redcarpet has a tonne of options and several different renderers that you can choose to enable, below is my setup.
Now you can render content anywhere throughout your application with markdown applied, by simply passing the markdown function your content like this.
Next you’ll need to add this to your routes.rb file.
This route is used to fire an AJAX request that will return a list of users, with usernames matching the characters typed into the text area.
I’ve added this function to the users_controller for simplicity.
With the routing in place you can add the following code to your users_controller.rb, you’ll notice that Mention.all is being passed a param, more on that in a bit .
Next is the coffeescript, you can write this code in Javascript if you prefer. I went with coffeescript here as I like the syntax and wanted to practice my coffeescript.
The remoteFilter callback allows us to fire a request to our Users controller to fetch a list of users to mention.
This will return a JSON object containing a list of usernames matching params[:q] and images for each user.
The “displayTpl” option is basically allowing us to specify what we do with the returned data.
Notice here I’ve added a CSS class called ‘mention-item’, this will allow you to tweak the look and feel of the dropdown menu.
Now you can add an after_create callback on your Post model called add_mentions, this will be invoked after the creation of any new posts.
Finally the Mention class, this class will contain all the logic for finding and creating our mentions.
Some of you might be thinking “why bother with a Mention class when you could just add this functionality to the User model”.
I extracted the functionality to this class for several reasons:
- It’s important to follow the single responsibility principle, this helps prevent ActiveRecord models from growing too complex and becoming a maintenance nightmare.
- It clearly defines the mention concept within the application.
- With this design it’s easy to extend the functionality of the feature further.
Conclusion
In my day job the mention feature was popular with the users working on our systems.
They asked if I could extend the feature so they could mention teams as well as users.
With this design it’s easy to add another subclass to the Mention class, I added a class called TeamMention to mention teams.
So now instead of having a simple username mention we have a polymorphic mention for both teams and users.
Let me know in the comment’s or on Twitter if you have any questions, comments or a creative implementation of the feature!